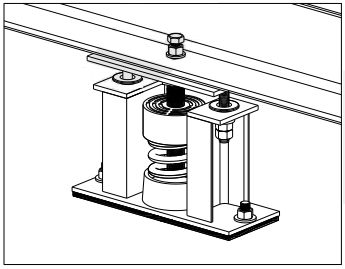
SHM型可調阻尼彈簧減震器安裝說明
SHM spring isolator installation guide
安裝前,請確認彈簧減震器的型號規格是否正確。
Before installation, make sure the model and the specification are?correct.
安裝說明
Installation guide
所需工具:公制口徑19mm (M12)、24mm (M16)、32mm (M22) 開口扳手、爪式千斤.。
Required tools: 19mm (M12), 24mm (M16) and 32mm (M22) open wrenches and claw jack.
在未完成減震器高度調整前,請勿將減震器的壓墊取出。
Before completing the adjustment of the isolator, do not remove the pressure pad from the isolator.
請先根據基礎螺栓固定孔的位置,與安裝位置預埋基礎螺栓。
Embed foundation bolt according to the location of bolt-loaded holes.
彈簧減震器安放到安裝位置后,先將定位柳釘拿掉。( 如圖1 )
Remove quilting rivet after installing the isolator (Fig 1) .
以M12固定螺栓將減震器與設備固定,但不鎖緊。( 如圖2 )
Fasten the isolator and the equipment with M12 fixed bolt without locking it (Fig 2).
將減震器利用基礎螺栓固定到地面上,並以臨時木臺固定高度。
Fasten the isolator with foundation bolt on the ground and fix the height with wooden panel.
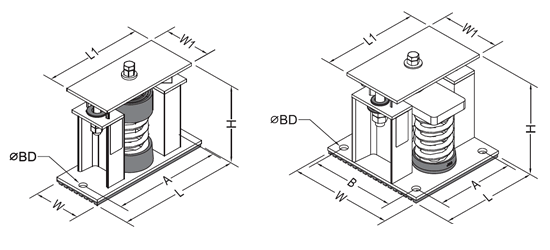
| 規格 | 外形尺寸(mm) | 固定 螺栓 |
?BD | ||||||
| L | W | L1 | W1 | A | B | H | |||
| SHM-1 | 260 | 100 | 210 | 100 | 230 | 0 | 200 | 12 | 13 |
| SHM-2 | 235 | 220 | 235 | 140 | 195 | 180 | 200 | 14 | 13 |
| SHM-4 | 320 | 165 | 320 | 165 | 290 | 90 | 200 | 14 | 13 |
| SHM-6 | 400 | 170 | 400 | 170 | 370 | 90 | 200 | 18 | 13 |
| SHM-9 | 420 | 250 | 420 | 250 | 384 | 180 | 200 | 18 | 13 |
B值為0表孔中心在W/2
撓度可定制40mm、50mm、75mm、100mm、125mm、150mm
| 型號/規格 | 載荷范圍(kg) | 豎向剛度(kg/mm) | 適用撓度(mm) |
| SHM-1-100 | 80~120 | 4 | 25 |
| SHM-1-150 | 120~180 | 6 | 25 |
| SHM-1-200 | 160~240 | 8 | 25 |
| SHM-1-250 | 200~300 | 10 | 25 |
| SHM-1-300 | 240~360 | 12 | 25 |
| SHM-1-350 | 280~420 | 14 | 25 |
| SHM-1-400 | 320~480 | 16 | 25 |
| SHM-1-450 | 360~540 | 18 | 25 |
| SHM-1-500 | 400~600 | 20 | 25 |
| SHM-1-600 | 480~720 | 24 | 25 |
| SHM-1-700 | 560~840 | 28 | 25 |
| SHM-1-850 | 680~1020 | 34 | 25 |
| SHM-1-1000 | 800~1200 | 40 | 25 |
| SHM-1-1200 | 960~1440 | 48 | 25 |
| SHM-2-600 | 480~720 | 24 | 25 |
| SHM-2-800 | 640~960 | 32 | 25 |
| SHM-2-900 | 720~1080 | 36 | 25 |
| SHM-2-1000 | 800~1200 | 40 | 25 |
| SHM-2-1200 | 920~1440 | 48 | 25 |
| SHM-2-1400 | 1120~1680 | 56 | 25 |
| SHM-2-1600 | 1280~1920 | 64 | 25 |
| SHM-2-2000 | 1600~2400 | 80 | 25 |
| SHM-4-600 | 480~720 | 24 | 25 |
| SHM-4-800 | 640~960 | 32 | 25 |
| SHM-4-1000 | 800~1200 | 40 | 25 |
| SHM-4-1200 | 960~1440 | 48 | 25 |
| SHM-4-1400 | 1120~1680 | 56 | 25 |
| SHM-4-1600 | 1280~1920 | 64 | 25 |
| SHM-4-2000 | 1600~2400 | 80 | 25 |
| SHM-4-2400 | 1920~2880 | 96 | 25 |
| SHM-4-2800 | 2240~3360 | 112 | 25 |
| SHM-4-3200 | 2560~3840 | 128 | 25 |
| SHM-4-4000 | 3200~4800 | 160 | 25 |
| SHM-4-4800 | 3840~5760 | 192 | 25 |
| SHM-6-3600 | 2880~4320 | 144 | 25 |
| SHM-6-4200 | 3360~5040 | 168 | 25 |
| SHM-6-5000 | 4000~6000 | 200 | 25 |
| SHM-6-6000 | 4800~7200 | 240 | 25 |
| SHM-6-7200 | 5760~8640 | 288 | 25 |
| SHM-9-4500 | 3600~5400 | 180 | 25 |
| SHM-9-5400 | 4320~6480 | 216 | 25 |
| SHM-9-6300 | 5040~7560 | 252 | 25 |
| SHM-9-7200 | 5760~8640 | 288 | 25 |
| SHM-9-9000 | 7200~10800 | 360 | 25 |
| SHM-9-10800 | 8640~12960 | 432 | 25 |
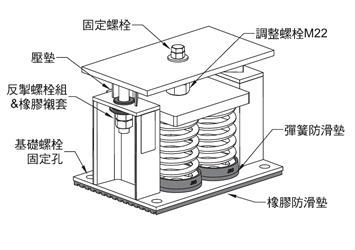
調整彈簧減震器高度時先松掉兩邊的反掣螺帽5~10mm ,並相對鎖緊。( 如圖3 )
Loosen the nuts on both sides for 5~10mm first before adjusting?height of the isolator and lock them afterwards (Fig 3).
使用公制口徑32mm 開口扳手以逆時針方向調整M22螺栓,使彈簧受力下壓、彈簧減震器上蓋鐵上升。(如圖4 )
Adjust M22 adjustment bolt in the anti-clockwise direction with 32mm open wrench to press down?the spring and to raise the iron sheet (Fig 4).
調整*壓墊可取出時,即可停止調整并取出木臺。( 如圖5 )
Adjustment can be stopped and wooden panel can be removed once you can take out the pressure?pad (Fig 5).
將與設備固定之M12螺栓完全鎖緊,即完成安裝調整。( 如圖6 )
After the adjustment, lock the isolator with M12 fixed bolt (Fig 6).
安裝后請檢查彈簧之下壓量,如彈簧壓實表示荷重不足沒有避震效果。應予更換較大荷重之規格,并請聯系本公司人員。
After the adjustment, check the press amount of the spring. If it appears with insufficient loading,pleaereplace with bigger loading by contacting our staff.
安裝時,請注意安全。
Be cautious during the installation.
保養點檢項目:每月觀察固定螺栓與基礎螺栓保持鎖緊、保持避震器安裝狀態&彈簧下壓撓度正常。
Maintenance checking points: Check the mounting bolts, remain fixed bolt locked, installation of the isolator, and the deflection of the spring.
圖1) 將定位柳丁取出,並以木臺固定高度。
Fig 1) Remove quilting rivet and fix the?height with wooden panel.
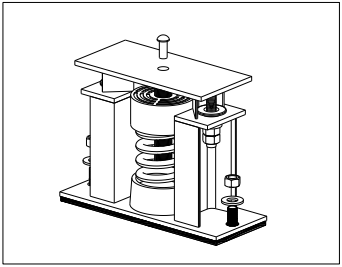
圖2) 以M12螺栓將彈簧減震器與設備固定,但不鎖緊;同時以基礎螺栓將彈簧減震器固定。
Fig 2) Fasten the isolator and the Equipment?with M12 fixed bolt without locking it. Fasten?the isolator with foundation bolt.
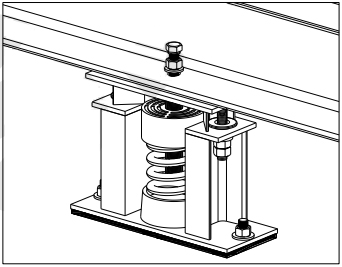
圖3) 調整彈簧減震器過度時,先松掉兩邊之反掣螺帽5~10mm ,并相對鎖緊。
Fig 3) Loosen the nuts on both sides for?5~10mm first before adjusting height of?the isolator and lock them afterwards.
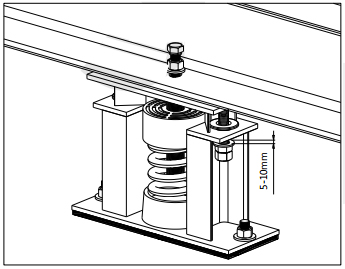
圖4) 使用公制開口板手以逆時針方向調整螺栓,使彈簧下壓、彈簧減震器上蓋鐵上升。
Fig 4) Adjust the bolt in the anticlockwise?direction with open wrench to press?down the spring and to raise the iron sheet.
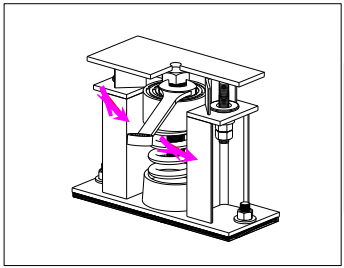
圖5) 調整彈簧減震器上蓋鐵升高,壓墊可以取出時即可完成調整并取出木臺。
Fig 5) Adjust until the iron sheet of the?isolator arises. Adjustment can be stopped?and wooden panel can be removed once?you can take out the pressure pad.
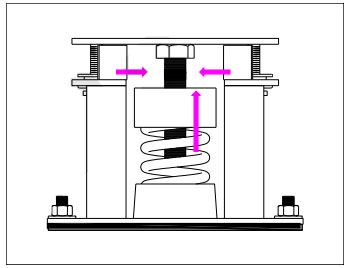
圖6) 將螺栓與設備完全鎖緊后,即完成彈簧減震器安裝調整。
Fig 6) After the adjustment, lock the isolator?with M12 fixed bolt 5-10mm
